Salinity Gauge HR-WQ-YD
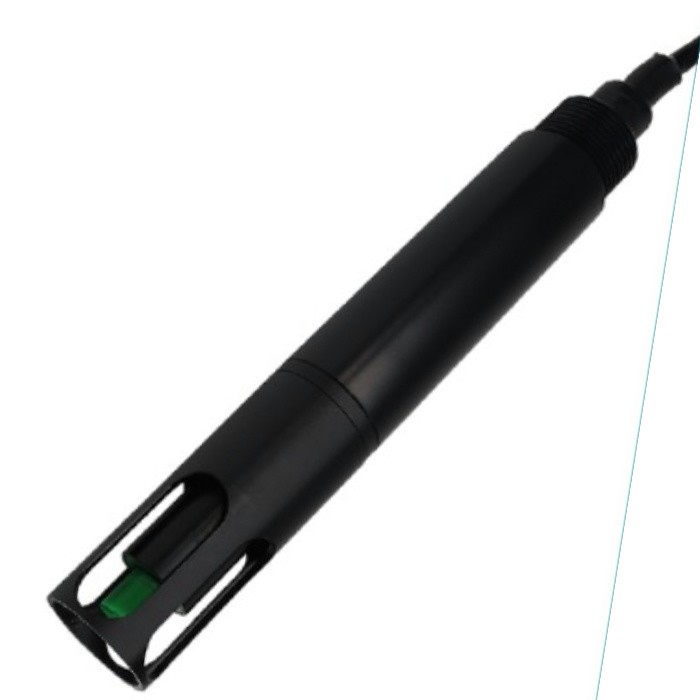
HR-WQ-YD is an inductance-based salinity sensor that operates without electrodes. It utilizes a generator to produce an alternating magnetic field in the primary coil, which induces a current in the medium. The strength of this induced current depends on the ion concentration in the medium. The induced current then generates another magnetic field in the secondary coil. The receiver measures the induced current in the coil, thereby determining the salinity of the medium. Additionally, it is equipped with an internal temperature sensor for automatic temperature compensation, making it suitable for long-term online environmental monitoring.
1. Product Features
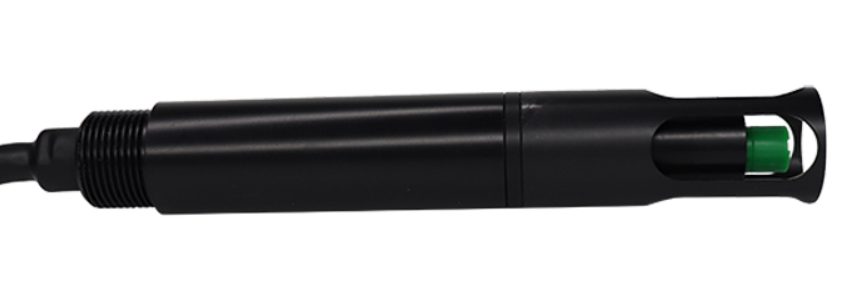
HR-WQ-YD is an inductance-based salinity sensor that operates without electrodes. It utilizes a generator to produce an alternating magnetic field in the primary coil, which induces a current in the medium. The strength of this induced current depends on the ion concentration in the medium. The induced current then generates another magnetic field in the secondary coil. The receiver measures the induced current in the coil, thereby determining the salinity of the medium. Additionally, it is equipped with an internal temperature sensor for automatic temperature compensation, making it suitable for long-term online environmental monitoring.
Features:
l Digital sensor with direct output of Rs-485 digital signal, supporting MODBUS/RTU.
l Internal temperature sensor for automatic temperature compensation.
l Electrode-free design, thus eliminating polarization reactions.
l Complete electrical isolation between the measurement and the medium, allowing for high-precision measurement of heavy or easily precipitating media or solutions, with low maintenance and operational costs.
l Low power consumption and anti-interference design in the internal circuitry.
Application Scope:
Online full-process monitoring in fields such as marine, industrial wastewater, pharmaceuticals, biotechnology, and industrial manufacturing.
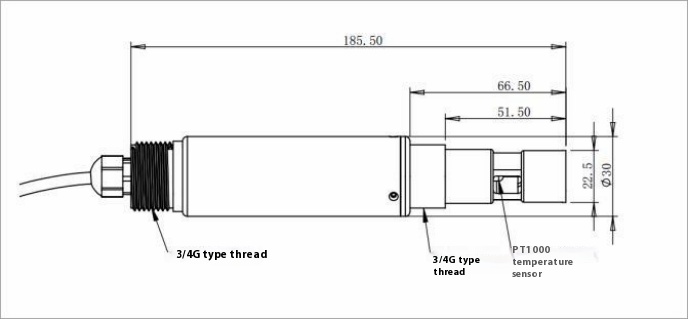
2. Diameters
3. Specifications
Name | Parameters |
Output Signal | Supports Rs-485, MODBUS/RTU protocol |
Measurement Method | Non-contact electromagnetic principle |
Measurement Range | 0~70PSU |
Accuracy | ±1%F.S. or ±0.2PSU (below 10PSU) |
Resolution | 0.1PSU |
Operating Conditions | 0~65℃; <0.6MPa |
Calibration Method | Two-point calibration |
Response Time | 10 seconds T90 |
Temperature Compensation | Automatic temperature compensation (PT1000) |
Power Supply | 12 or 24VDC ±10%, 10mA; |
Dimensions | Diameter 30mm; Length 185.5mm; |
Protection Level | IP68; Water depth 20 meters; Other customization available |
Service Life | Sensor 3 years or more |
Cable Length | 10 meters (default), customizable |
Sensor Housing Material | POM; PEEK; customizable |
4. Installation Notes and Cable Definitions
4.1 Installation
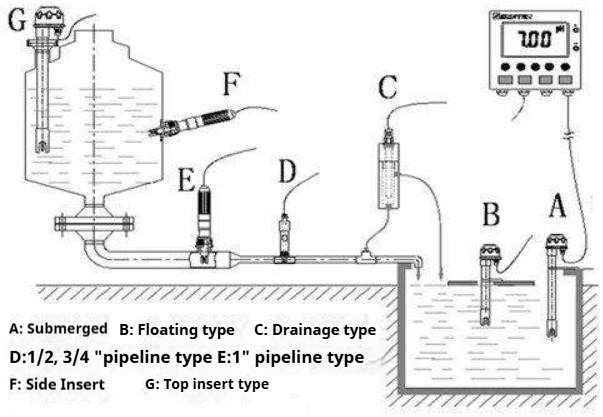
Note: When installing and testing the sensor, ensure it is at least 2 cm away from the bottom and side walls of the container.
4.2 Electrical Connections
Brown wire: Power line (12 or 24VDC)
Black wire: Ground wire (GND)
Blue wire: 485A
White wire: 485B
Bare wire: Shielding layer
Sensor cable: 4-wire AWG-24 or AWG-26 shielded cable. Outer diameter: 6.0-6.2mm; flexible twisted pair shielded cable.
5. Calibration
a) Zero-point Calibration
Rinse the sensor's measuring probe surface with distilled water and blot dry with filter paper. Place the sensor in the air and wait for the value to stabilize, then send the zero-point calibration command. The value should stabilize within approximately 3 minutes.
b) Slope Calibration
Insert the sensor into a slope standard buffer solution (e.g., 50PSU) and wait for the value to stabilize, then send the slope calibration command. The value should stabilize within approximately 3 minutes.
Note: During calibration, keep the sensor's measuring probe at least 2 cm away from the bottom of the container.
Refer to the MODBUS RTU communication protocol operation manual for calibration commands.
Note: The sensor is calibrated before leaving the factory. It is not advisable to recalibrate it unless the measurement error exceeds the acceptable range.
6.Maintenance and Precautions
6.1 Maintenance
The inductive electrode is essentially maintenance-free. It is recommended to clean any attachments on the sensor's measuring probe every 30 days. When cleaning, avoid using hard objects that may scratch the light-guiding part of the probe; use a soft, damp cloth instead.
It is recommended to rinse the outer surface of the sensor with water. If debris remains, wipe it off with a damp, soft cloth.
6.2 Precautions
Installation and Measurement: Avoid installing the sensor in areas with turbulent water flow to reduce the impact of water bubbles on measurements. Keep the measuring probe 2 cm away from the bottom.
If the sensor probe becomes scaled or covered with biofilm, you may need to apply more force when cleaning. Minor scratches on the probe surface will not affect the sensor's normal operation. However, be careful not to penetrate the probe's housing.
Recommendation: Use our company's optional protective cover to prevent microorganism attachment from affecting measurement results.
6.3 Other
Issue | Possible Cause | Solution |
Operation interface cannot connect or does not display measurement results | Incorrect cable wiring | Check the wiring |
Check if the address is correct | Check the address | |
Measurement value is too high, too low, or continuously unstable | Sensor probe is covered with foreign matter | Clean the surface of the sensor probe |
Other | Contact customer support |
7. Quality and Service
7.1 Quality Assurance
Thank you for choosing our products! Since its establishment, our company has always regarded product quality as the core of our market competition.
Based on product quality requirements, the company has established a rigorous quality inspection system. We strictly control and manage all aspects related to product quality, establish scientific inspection procedures, quantify inspection indicators, and assign responsibilities to individuals to ensure the continuous and stable production of qualified products. The company strictly controls raw materials, eliminates products without quality assurance, selects products from well-known domestic and foreign manufacturers, establishes strict product process indicators, and establishes good supply and demand relationships with suppliers.
Our company has established a regular employee quality training system to learn new knowledge and information about quality management, foster a quality consciousness in every employee, regulate their behavior, and strive for excellence in every detail, from a small solder joint or a wire to a complete machine. The quality inspection department has established standardized inspection procedures, equipped with advanced and complete testing equipment and methods, and strictly follows the procedures for inspection, ensuring every aspect of product quality testing is carried out properly, and no unqualified product leaves the factory.
Our company provides after-sales service for the product itself within one year from the date of sale, but this does not cover damage caused by improper use. If repair or adjustment is needed, please return the product, but the shipping cost will be borne by the customer.
7.2 Accessories and Spare Parts
Description | Quantity (pcs) |
Sensor | 1 |
Instruction manual | 1 |
Certificate of conformity | 1 |
Protective cover | 1(optional) |
INQUIRY
CATEGORIES
LATEST NEWS
CONTACT US
Contact:Roxy Deng
Phone:+8617794001501
Tel:+8617794001501
Email:roxy@besteetech.com
Add:Weibin District, Baoji, Shaanxi Province, China
 Roxy Deng
 Roxy Deng